🕓 7 MINWe’re excited to …
Safari 16.4 Support for WebAssembly fixed-width SIMD. How to use it with C#
- Gerard Gallant
- Published
This article covers:
What is WebAssembly’s fixed-width SIDM.
Creating an Uno Platform WebAssembly project with code using the Vector128 type.
Adjusting the project file to ahead-of-time (AOT) compile and include SIMD support.
Fixing a publishing error if you accidentally checked the AOT compile option in the Publish dialog.

WebAssembly has a feature called fixed-width SIMD that takes advantage of hardware instructions to speed up calculations by running them in parallel. Chrome and Firefox added support for the feature back in 2021, which was good, but many devices couldn’t leverage the performance improvements without Safari’s support. That all changed on March 27th, 2023, because Safari 16.4 was released, and now all modern browsers support WebAssembly fixed-width SIMD!
Fixed-Width SIMD
(Single Instruction, Multiple data) is a type of parallel processing that takes advantage of an architecture’s SIMD instructions to perform the same operation on multiple data points simultaneously. Because there are multiple types of SIMD, the WebAssembly Community Group decided that it would be best to start with fixed-width 128-bit operations because they’re available across most modern architectures and are proven to be performant. More details on the proposal can be found here if you’re interested: https://github.com/webassembly/simd.
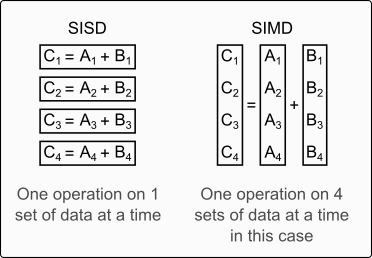
The following image is a visual representation comparing data being processed one element at a time with normal arithmetic (Single Instruction, Single Data) versus four at a time with SIMD:
This article will focus on how to take advantage of SIMD in your C# code rather than doing in-depth benchmarks. The following article gives a good overview of SIMD and some benchmarks if you’re interested: https://www.infoq.com/articles/webassembly-simd-multithreading-performance-gains/
When working in the browser, JavaScript and WebAssembly are often comparable in their abilities because browser makers have put a lot of effort into JavaScript’s features and performance over the years. SIMD brings a change to the browser dynamic because this feature is only available via WebAssembly.
Imagine you have an application periodically pulling information from several sources, crunching the numbers and then displaying the results in a dashboard. Because your company does a lot of work with .NET, the Uno Platform was chosen so that your developers don’t need to switch programming languages in order to create an application that runs on a variety of systems including in a web browser.
When running in a browser, the Uno Platform leverages WebAssembly. Because all modern browsers now support the WebAssembly fixed-width SIMD specification, and because support for WebAssembly SIMD was added to .NET 7, you’re curious to find out if using SIMD would improve your dashboard’s performance.
Rather than jumping in with both feet and reworking your application’s code to use SIMD, you decide that it would be best to test if using SIMD will actually bring a performance improvement. To verify this, you’re going to create a simplified version of your app that takes an array of numbers and calculates their sum. You’ll create two functions where one will use normal C# code and the other will use SIMD operations so that you can compare their durations.
Create an Uno Platform App
Before you start, ensure your environment is set up for the Uno Platform.
Once your environment is set up, you can either use the Visual Studio 2022 template as shown below or use the dotnet new templates.
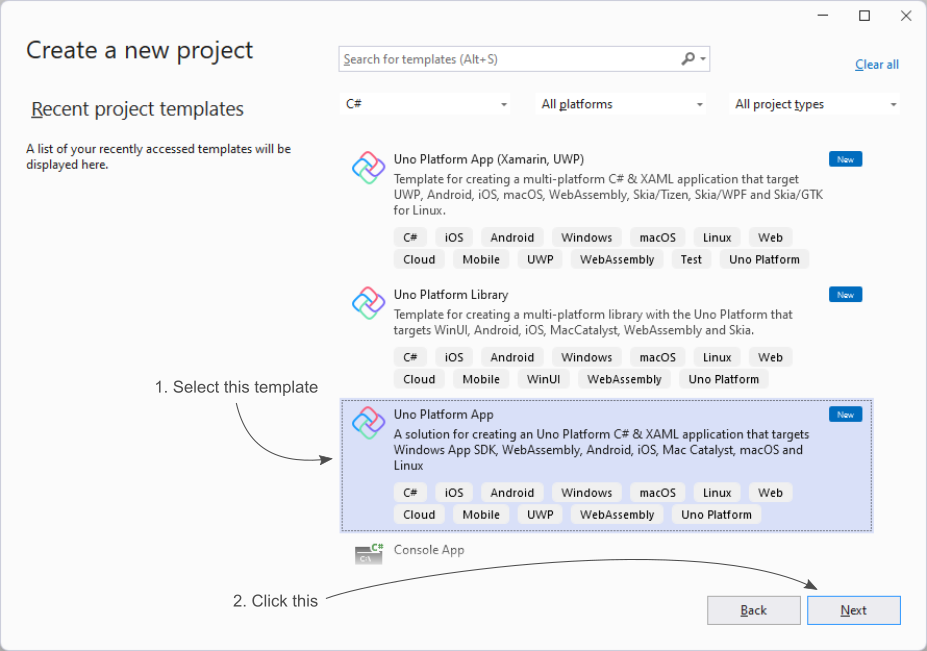
When using Visual Studio, click on the File, New Project… menu item and then, as shown in the following image, search for the Uno Platform App template. Select the template and then click Next.
In the next dialog that’s displayed, give the project a name, adjust the location if you’d like the project somewhere other than the default location, and then click Create.
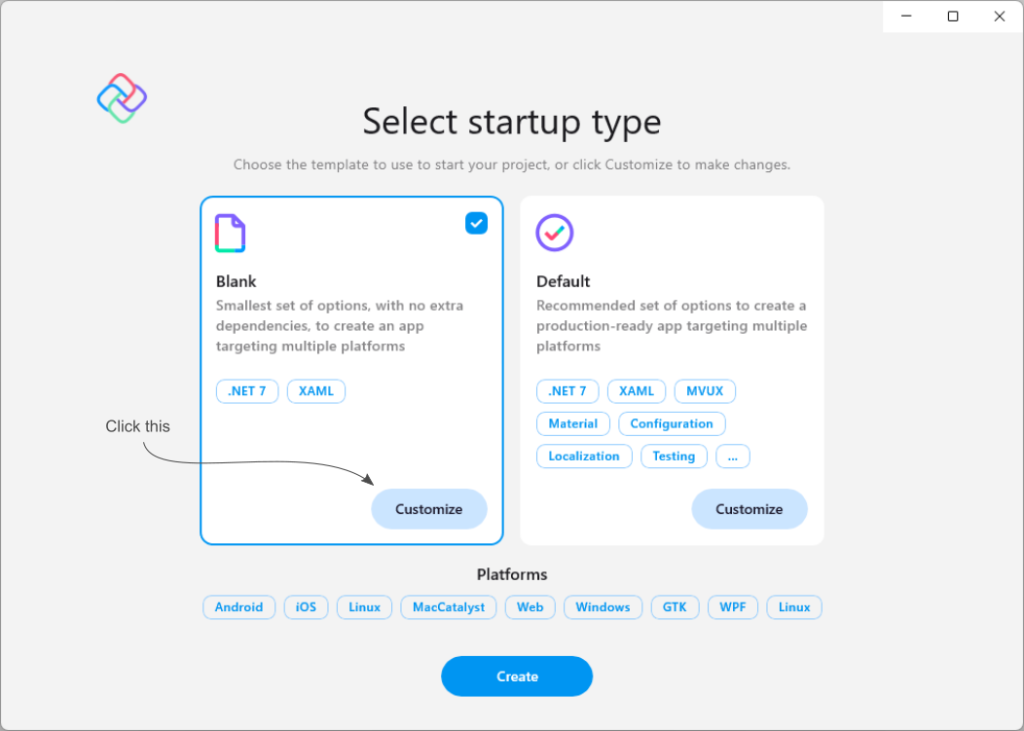
When the Select startup type dialog is displayed, click the Customize button of the Blank item as shown in the following screenshot:
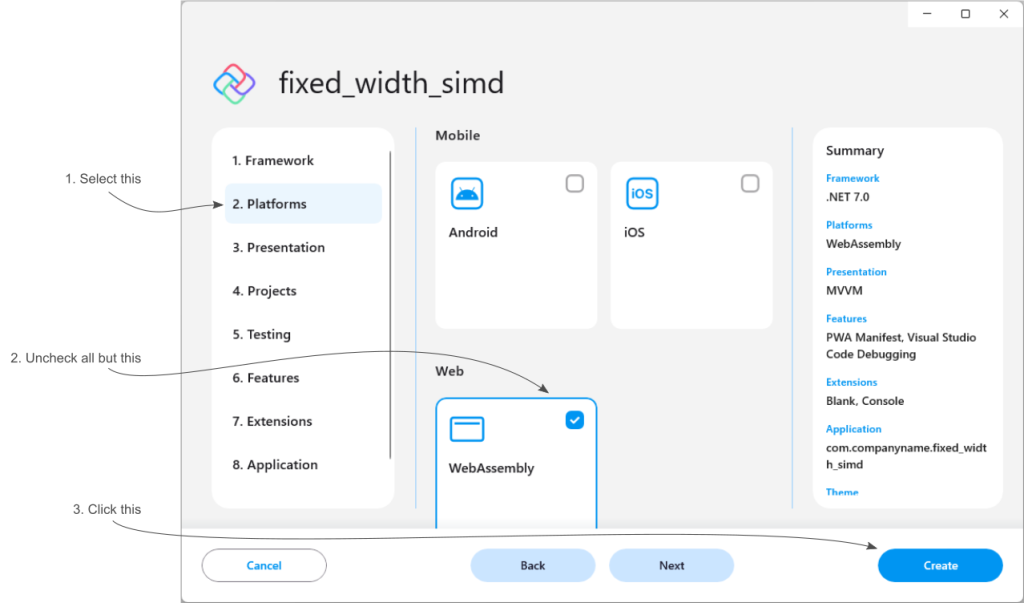
As shown in the following screenshot, one last dialog will be displayed allowing you to customize your solution. For this test, we’re only interested in having a WebAssembly project so click on 2. Platforms item in the list on the left, uncheck everything except for WebAssembly in the middle section, and then click the Create button.
Creating the Test Code
When you created this solution, if you unchecked everything but WebAssembly, you should see two projects in the Solution Explorer. The WebAssembly project ends in .Wasm and the other is a shared project. In the shared project, open the MainPage.xaml file and replace the TextBlock element with the following elements. The Button element will trigger your test functions when clicked and the TextBlock elements will hold the duration that each function’s code takes to execute:
					<Button Content="Run the Calculations" Click="runTest" />

<TextBlock Margin="0,10,0,0" FontWeight="bold" Text="Normal duration: "></TextBlock>
<TextBlock x:Name="durationNormal"></TextBlock>

<TextBlock Margin="0,10,0,0" FontWeight="bold" Text="SIMD duration: "></TextBlock>
<TextBlock x:Name="durationSIMD"></TextBlock>
In the Solution Explorer, if the MainPage.xaml.cs file isn’t visible, click on the little arrow to the left of the MainPage.xaml file to expand it. Open the MainPage.xaml.cs file.
After the MainPage constructor, add the following variables. The _data array will hold the test data and the _dataCount variable will indicate how many elements we want added to the array:
					private int[]? _data;
private int _dataCount = 5_000_000;
After the member variables, add the following runTest function that gets called when you click on the button. This function will populate the array with data and then call the two functions to calculate the sum of the array. A random number generator is used to populate the elements of the array setting each to a value between 1 and 5.
					private async void runTest(object sender, RoutedEventArgs e)
{
  Random rng = new Random();
  _data = new int[_dataCount];
  for (int i = 0; i < _dataCount; i++) { _data[i] = rng.Next(1, 5); }

  runTestNormal();
  runTestSIMD();
}
Now, after the runTest function, add the following runTestNormal function that will calculate the array’s sum using normal addition. In the function, the Stopwatch class is used to time how long the code takes to execute and then the result is placed in the normal duration TextBlock element:
					private void runTestNormal()
{
  Stopwatch sw = new Stopwatch();
  sw.Start();

  int result = 0;
  for (int i = 0; i < _dataCount; i++) { result += _data![i]; }

  sw.Stop();
  durationNormal.Text = $"{sw.ElapsedMilliseconds:n0}ms. Calculated result: {result:n0}";
}
The final function you’re going to create will calculate the array’s sum using the Vector128 object. I won’t go into all of the details about the Vector128 object here but, if you’re interested, the Microsoft documentation has more information: https://learn.microsoft.com/en-us/dotnet/api/system.runtime.intrinsics.vector128?view=net-7.0
When you add two Vector128 values together, the value from element 0 of the first object is added to the value at element 0 in the second object and the result is placed in element 0 of the return object. Element 0 is a lane. Element 1 would be another lane and so on.
WebAssembly’s Fixed-width SIMD uses 128-bit wide vectors. The number of values that can be calculated at once depends on the size of the data type used. The following image shows how many lanes are possible for 128-bit SIMD operations based on the size of the data type:
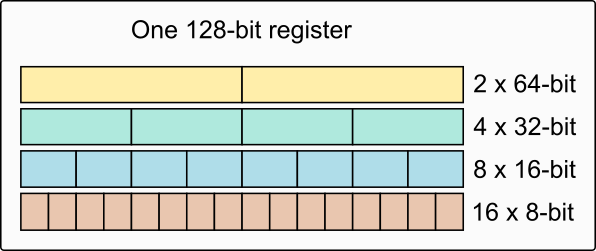
Ints in C# are the System.Int32 type which, as the name indicates, are 32-bits in size. This means you’re able to calculate 4 items at a time when using 32-bit values.
The first thing the runTestSIMD function will need to do is get a representation of the array’s data in a format that can be used by the Vector128 class methods. To do this, you can cast the data to a ReadOnlySpan. Then you loop through each span adding them together using the Vector128.Add method.
The Vector128 result object will hold elements with the sum of each lane. Your code will then need to loop over the elements in the result object and sum them together to get the final total. Add the following runTestSIMD function after your runTestNormal function:
					private void runTestSIMD()
{
  Stopwatch sw = new Stopwatch();
  sw.Start();

  // Convert the array into span and then loop through the span's items
  Vector128<int> vectorResult = Vector128<int>.Zero;
  ReadOnlySpan<Vector128<int>> spanValues = MemoryMarshal.Cast<int, Vector128<int>>(_data);
  for (int i = 0; i < spanValues.Length; i++)
  {
    vectorResult = Vector128.Add<int>(vectorResult, spanValues[i]);
  }

  // vectorResult holds the sum of each group (lane). Now we need to sum up the groups
  int lanes = Vector128<int>.Count;
  int result = 0;
  for (int i = 0; i < lanes; i++) { result += vectorResult.GetElement(i); }

  sw.Stop();
  durationSIMD.Text = $"{sw.ElapsedMilliseconds:n0}ms. Calculated result: {result:n0}";
}
With your code now complete, let’s give this a run to see what the durations looks like.
Run the Tests
In the Solution Explorer, right-click on the .Wasm project and choose Set as Startup Project.
Start the project without debugging (Ctrl + F5) and then click the button. After a few seconds, you should see the results displayed in the TextBlock elements similar to the following:
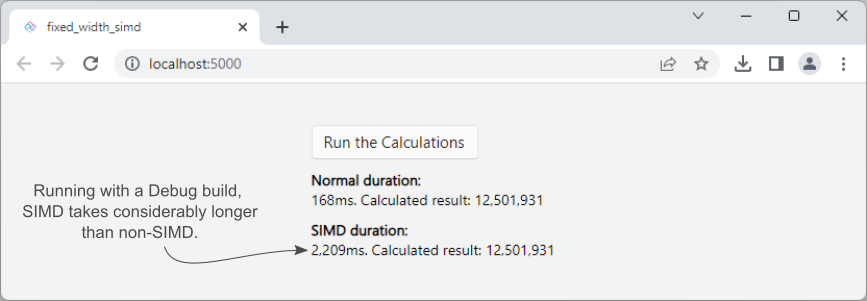
Running in Debug mode is usually slower than in Release mode so changing your configuration and running the code again will give you better performance, as shown in the following screenshot:
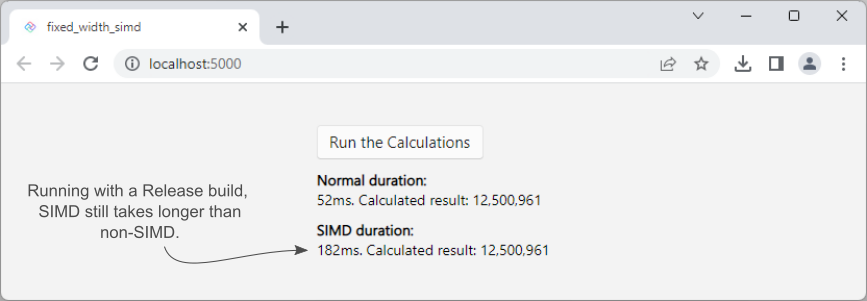
Unfortunately, the SIMD code is still slower than the normal code. At this point you might be asking yourself “what’s going on?” SIMD is supposed to give better performance but we’re seeing significantly worse performance.
The reason for this is that, by default, .NET code in the browser is running in interpreted mode in the Mono runtime. There is work going on in .NET 8 to improve SIMD performance when in interpreted mode but, to really take advantage of SIMD, you need to ahead-of-time (AOT) compile your code so that it runs as WebAssembly.
AOT Compiling
In the Solution Explorer, right click on your .Wasm project and choose Edit Project File from the context menu.
As shown in the following screenshot, find the <WasmShellMonoRuntimeExecutionMode> tag and remove the comments from around it (<!– and –>). Then add the following tag to enable SIMD support:
<WasmShellEnableSimd>true</WasmShellEnableSimd>
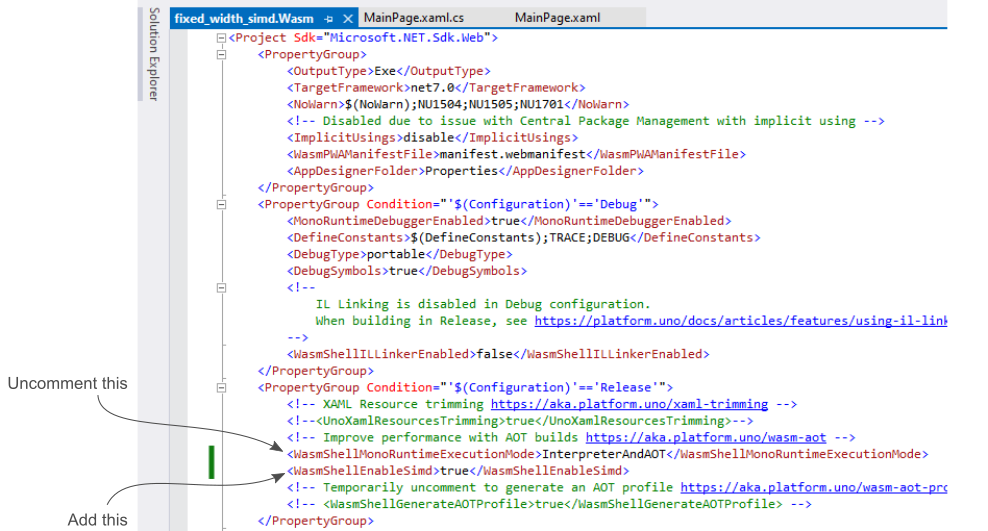
Save your changes, make sure your project is set to Release mode and rebuild. This will take a few minutes.
As shown in the following screenshot, when you run your code now, the SIMD performance should be much better:
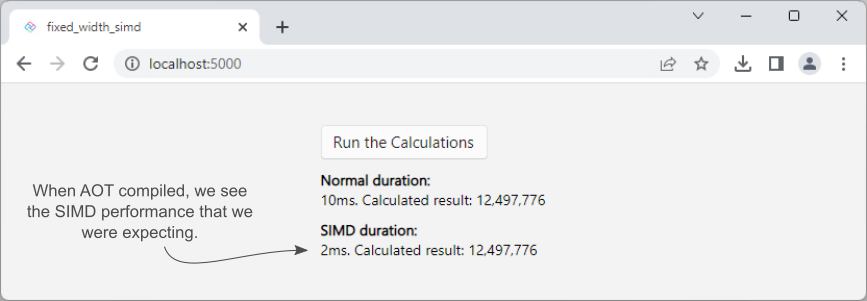
We’ve been able to prove that SIMD is faster than normal calculations but the duration differences wouldn’t be noticeable if this is all that’s being calculated. Depending on the quantity and complexity of the calculations, however, that small performance improvement per calculation adds up.
⚠️Warning When Publishing Your Project
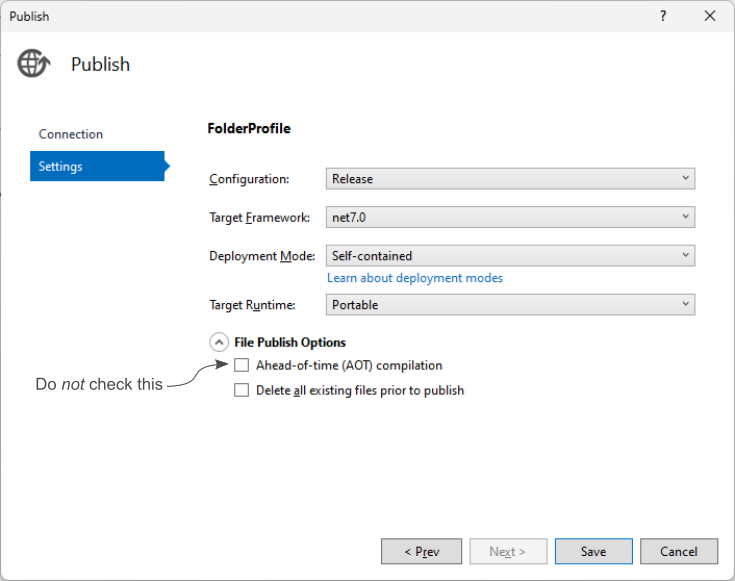
If you chose to Publish your project, do not check the Ahead-of-time (AOT) compilation option on the Publish dialog because, doing so, will cause an error during the publish. The error complains about not having a target for net7.0/win-x64 in my case but the message may differ slightly for you depending on your OS.
Once you get the error, unchecking the AOT checkbox doesn’t cause the error to go away. To get rid of the error, you’ll need to edit your publish profile file.
The file can be found in Solution Explorer under Properties, PublishProfiles. Locate the <SelfContained>true</SelfContained> line in the file and delete it.
Summary
In this article, you learned that .NET 7.0 added support for WebAssembly’s 128-bit fixed-width SIMD (Single Instruction, Multiple Data) operations. To target these SIMD operations in your C# code, you need to use the Vector128 type.
The size of the data type used in the Vector128 type determines how many lanes (elements) can be processed at once:
2 x 64-bit
4 x 32-bit
8 x 16-bit
16 x 8-bit
By default, your code will run in interpreted mode where the SIMD operations are currently slower than normal operations. The .NET team is working on making some performance improvements to the interpreted mode execution of SIMD in .NET 8 but, to really see the performance gains of SIMD, your code needs to be ahead-of-time (AOT) compiled so that it runs as WebAssembly.
To AOT compile an Uno Platform’s project with SIMD support, you need to edit the .Wasm project file and specify the following tags. Because it takes time to AOT compile, it’s best to only have these tags executed in Release mode.
					<WasmShellMonoRuntimeExecutionMode>InterpreterAndAOT</WasmShellMonoRuntimeExecutionMode>
<WasmShellEnableSimd>true</WasmShellEnableSimd>
When publishing your project, it’s important to remember not to check the ahead-of-time (AOT) compilation checkbox on the Publish dialog because that will cause an error to be thrown. If you did make the mistake of checking the AOT checkbox, edit the publish profile file and delete the <SelfContained>true</SelfContained> line.
About Uno Platform
For those new to the Uno Platform, it allows for creating pixel-perfect, single-source C# and XAML apps that run natively on Windows, iOS, Android, macOS, Linux and Web via WebAssembly. In addition, it offers Figma integration for design-development handoff and a set of extensions to bootstrap your projects. Uno Platform is free, open-source (Apache 2.0), and available on GitHub.
Next Steps
To upgrade to the latest release of Uno Platform, please update your packages to 4.8 via your Visual Studio NuGet package manager! If you are new to Uno Platform, following our official getting started guide is the best way to get started. (5 min to complete)
Tags:
